前言
既然是分布式系统,就绕不开部署模式。
部署模式
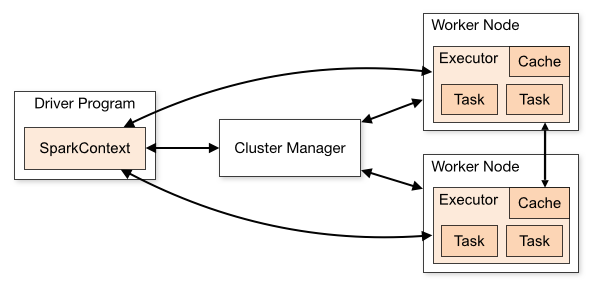
一篇文章读懂:Spark运行模式运行Spark的应用程序,其实仅仅需要两种角色,Driver和Executor。Driver负责将用户的应用程序划分为多个Job,分成多个Task,将Task提交到Executor中运行。Executor负责运行这些Task并将运行的结果返回给Driver程序。Driver和Executor实际上并不关心是运行在哪的,只要能够启动Java进程,将Driver程序和Executor运行起来,并能够使Driver和Executor进行通信即可(PS:Driver 和 Executor 不需要各自是一个独立的进程)。所以根据Driver和Executor的运行位置的不同划分出了多种部署模式。
-
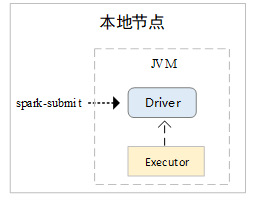
本地运行,一般在开发测试时使用,通过在本地的一个JVM进程中同时运行driver和1个executor进程,实现Spark任务的本地运行。
-
集群运行,在集群中运行时,Spark当前可以在Spark Standalone集群、YARN集群、Mesos集群、Kubernetes集群中运行。其实现的本质都是考虑如何将Spark的Driver进程和Executor进程在集群中调度,并实现Dirver和Executor进行通信。如果解决了这两大问题,也就解决了Spark任务在集群中运行的大部分问题。每一个Spark的Application都会有一个Driver和一个或多个Executor。在集群中运行时,多个Executor一定是在集群中运行的。而Driver程序,可以在集群中运行,也可以在集群之外运行,即在提交Spark任务的机器上运行。当Driver程序运行在集群中时,被称为cluster模式。当Driver程序运行在集群之外时,称为client模式。
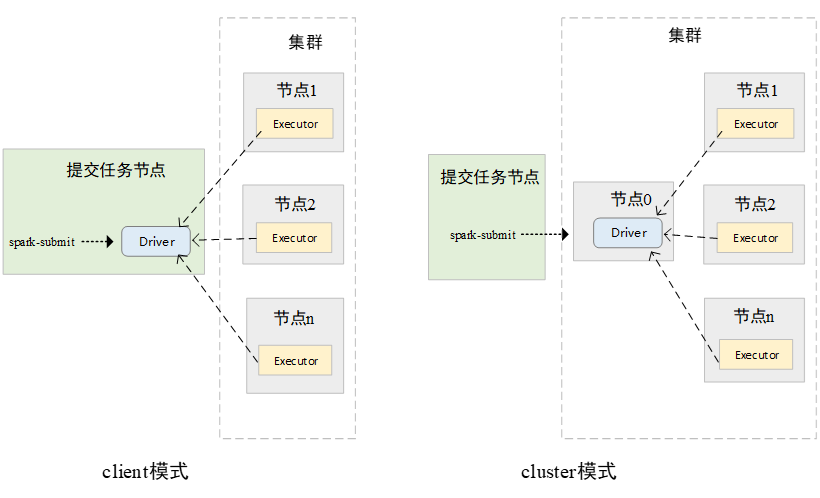
在不同的环境中运行Executor,其实都是通过SchedulerBackend接口不同实现类实现的。SchedulerBackend通过与不同的集群管理器(Cluster Manager)进行交互,实现在不同集群中的资源调度。
standalone
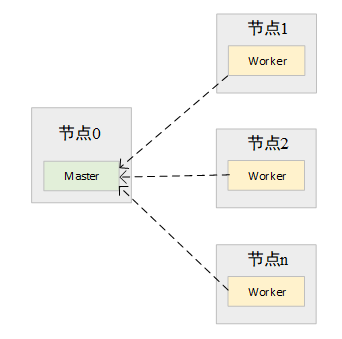
Spark框架除了提供Spark应用程序的计算框架外,还提供了一套简易的资源管理器(跟早期的mapduce非常像,计算框架和资源管理都有)。该资源管理器由Master和Worker组成。Master负责对所有的Worker运行状态管理,如Worker中可用CPU、可用内存等信息,Master也负责Spark应用程序注册,当有新的Spark应用程序提交到Spark集群中时,Master负责对该应用程序需要的资源进行划分,通知Worker启动Driver或Executor。Worker负责在本节点上进行Driver或Executor的启动和停止,向Master发送心跳信息等。
client 和 cluster 模式
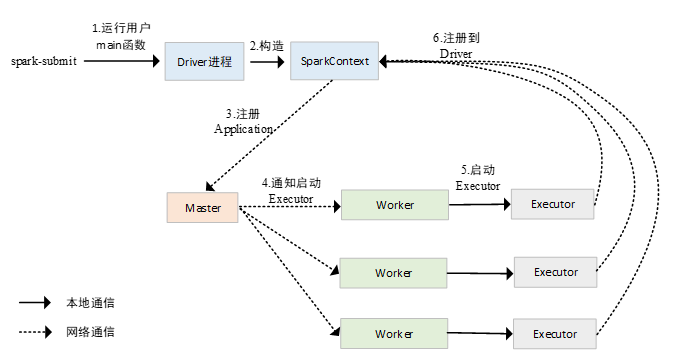
在client模式下,用户执行spark-submit脚本后,会在执行的节点上直接运行用户编写的main函数。在用户编写的main函数中会执行SparkContext的初始化。在SparkConext初始化的过程中,该进程会向Spark集群的Master节点发送消息,向Spark集群注册一个Spark应用程序,Master节点收到消息后,会根据应用程序的需求,通知在Worker上启动相应的Executor,Executor启动后,会再次反向注册到Driver进程中。此时Driver即可知道所有的可用的Executor,在执行Task时,将Task提交至已经注册的Executor上。PS:driver 运行在执行节点上
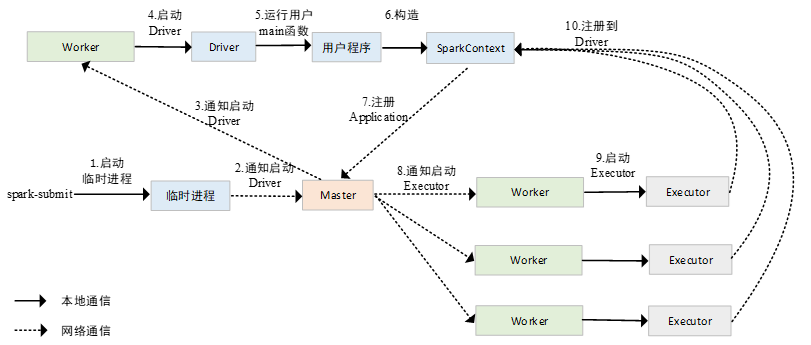
在cluster模式下,用户编写的main函数即Driver进程并不是在执行spark-submit的节点上执行的,而是在spark-submit节点上临时启动了一个进程,这个进程向Master节点发送通知,Master节点在Worker节点中启动Driver进程,运行用户编写的程序,当Driver进程在集群中运行起来以后,spark-submit节点上启动的进程会自动退出,其后续注册Application的过程,与client模式是完全相同的。PS: driver 在cluster 中临时启动
Yarn Cluster模式下 源码分析
Spark YarnCluster源码分析(一)之提交任务(超级详细)
整体设计
代码上
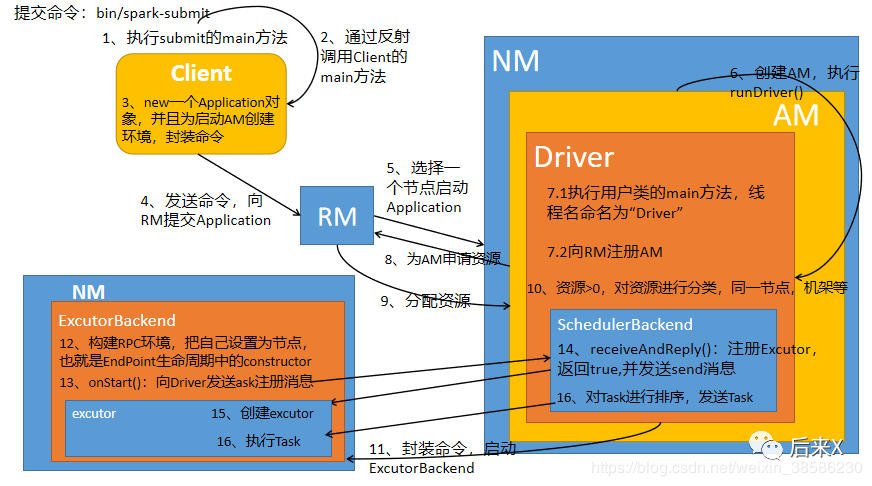
- client: SparkSubmit.main ==> org.apache.spark.deploy.yarn.Client.main 向yarn 为AM 申请一个 container 让AM 可以跑起来。
- AM: ApplicationMaster.main ==> ApplicationMaster.run ==> wordcount.main 作为driver,并启动ExecutorBackend 准备与driver.DAGScheduler 交互
- Executor侧:ExecutorBackend.main ==> ExecutorBackend.run ==> ExecutorBackend.onStart 向driver 注册,receive 接收driver.DAGScheduler 指令
- 剩下的就是 driver.DAGScheduler 与 driver.TaskScheduler 如何拆分、调度Task,ExecutorBackend 收到Task 如何执行的问题了。wordcount.main ==> DAGScheduler.runJob/submitJob/submitStage ==> TaskScheduler 为TaskSet 计算适合的节点 返回 DAGScheduler TaskDescriptions,DAGScheduler 将其中封装的任务代码分发到对应的 Executors 上,开启分布式任务执行流程。
客户端操作
客户端干了哪些活儿
- 根据yarnConf来初始化yarnClient,并启动yarnClient
- 创建客户端Application,并获取Application的ID,进一步判断集群中的资源是否满足executor和ApplicationMaster申请的资源,如果不满足则抛出IllegalArgumentException;
- 设置资源、环境变量:其中包括了设置Application的Staging目录、准备本地资源(jar文件、log4j.properties)、设置Application其中的环境变量、创建Container启动的Context等;
- 设置Application提交的Context,包括设置应用的名字、队列、AM的申请的Container、标记该作业的类型为Spark;
- 申请Memory,并最终通过yarnClient.submitApplication向ResourceManager提交该Application。
不管是什么spark的哪种运行模式,提交任务的命令都少不了Spark-submit,下面以提交wordCount的项目的命令为例:
bin/spark-submit \
	--class com.later.WordCount \
	--master yarn \
	--deploy-mode cluster \
	/test/jars/spark-WordCount.jar \
	10
object SparkSubmit {
  def main(args: Array[String]): Unit = {
    val appArgs = new SparkSubmitArguments(args)
    if (appArgs.verbose) {
      // scalastyle:off println
      printStream.println(appArgs)
      // scalastyle:on println
    }
	// .action 默认为submit
    appArgs.action match {
      case SparkSubmitAction.SUBMIT => submit(appArgs)
      case SparkSubmitAction.KILL => kill(appArgs)
      case SparkSubmitAction.REQUEST_STATUS => requestStatus(appArgs)
    }
  }
  private def submit(args: SparkSubmitArguments): Unit = {
	// 准备提交job的环境,为runMain 准备参数
    val (childArgs, childClasspath, sysProps, childMainClass) = prepareSubmitEnvironment(args)
    def doRunMain(): Unit = {
	  ...
      runMain(childArgs, childClasspath, sysProps, childMainClass, args.verbose)
    }
	...
    doRunMain()
  }
}
- cluster模式->childMainClass =
org.apache.spark.deploy.yarn.Client - client模式->childMainClass =
com.later.WordCount
object SparkSubmit {
  private def runMain(childArgs: Seq[String],childClasspath: Seq[String],sysProps: Map[String, String],childMainClass: String,verbose: Boolean): Unit = {
	val loader = 决定classloader
	Thread.currentThread.setContextClassLoader(loader)
	for (jar <- childClasspath) {
		addJarToClasspath(jar, loader)
	}
	for ((key, value) <- sysProps) {
		System.setProperty(key, value)
	}
	var mainClass: Class[_] = null
	mainClass = Utils.classForName(childMainClass)
	val mainMethod = mainClass.getMethod("main", new Array[String](0).getClass)
	mainMethod.invoke(null, childArgs.toArray)
  }
}
main 方法也像普通方法一样,被method.invoke执行了。SparkSubmit.main ==> org.apache.spark.deploy.yarn.Client.main
我们来看下 org.apache.spark.deploy.yarn.Client 的main 方法实现
// spark/yarn/src/main/scala/org/apache/spark/deploy/yarn/Client.scala
private object Client extends Logging {
  def main(argStrings: Array[String]) {
    // Set an env variable indicating we are running in YARN mode.
    // Note that any env variable with the SPARK_ prefix gets propagated to all (remote) processes
    System.setProperty("SPARK_YARN_MODE", "true")
    val sparkConf = new SparkConf
    // SparkSubmit would use yarn cache to distribute files & jars in yarn mode,so remove them from sparkConf here for yarn mode.
    sparkConf.remove("spark.jars")
    sparkConf.remove("spark.files")
    val args = new ClientArguments(argStrings)
    new Client(args, sparkConf).run()
  }
  // 向ResourceManager提交申请,获取appID
  def run(): Unit = {
    this.appId = submitApplication()
	// Submit an application to the ResourceManager.If set spark.yarn.submit.waitAppCompletion to true, it will stay alive reporting the application's status until the application has exited for any reason.Otherwise, the client process will exit after submission.If the application finishes with a failed, killed, or undefined status, throw an appropriate SparkException.
	...
  }
  // Submit an application running our ApplicationMaster to the ResourceManager.
  def submitApplication(): ApplicationId = {
    var appId: ApplicationId = null
    launcherBackend.connect()
    yarnClient.init(yarnConf)
    yarnClient.start()
    logInfo("Requesting a new application from cluster with %d NodeManagers".format(yarnClient.getYarnClusterMetrics.  getNumNodeManagers))
    // Get a new application from our RM
    val newApp = yarnClient.createApplication()
    val newAppResponse = newApp.getNewApplicationResponse()
    appId = newAppResponse.getApplicationId()
    reportLauncherState(SparkAppHandle.State.SUBMITTED)
    launcherBackend.setAppId(appId.toString)
    new CallerContext("CLIENT", Option(appId.toString)).setCurrentContext()
    // Verify whether the cluster has enough resources for our AM
    verifyClusterResources(newAppResponse)
    // Set up the appropriate contexts to launch our AM
    val containerContext = createContainerLaunchContext(newAppResponse)				// 封装命令
    val appContext = createApplicationSubmissionContext(newApp, containerContext)
    // Finally, submit and monitor the application
    logInfo(s"Submitting application $appId to ResourceManager")
    yarnClient.submitApplication(appContext)										// 提交命令
    appId
  }
}
AM的命令:val commands = /bin/java "org.apache.spark.deploy.yarn.ApplicationMaster" --class WordCount…,到此,Client已经向RM提交了申请,由RM指定一个NM来执行封装的命令,启动AM。
当作业提交到YARN上之后,客户端就没事了,甚至在终端关掉那个进程也没事,因为整个作业运行在YARN集群上进行,运行的结果将会保存到HDFS或者日志中。Spark Yarn Client向YARN中提交应用程序,包括ApplicationMaster程序、启动ApplicationMaster的命令、需要在Executor中运行的程序等;
梳理下上述代码
val appArgs = new SparkSubmitArguments(args)
submit(SparkSubmitArguments)
  val (childArgs, childClasspath, sysProps, childMainClass) = prepareSubmitEnvironment(args)
  runMain(childArgs, childClasspath, sysProps, childMainClass, args.verbose)
    loader = xx
    addJarToClasspath
    System.setProperty(key, value)
    mainClass = Utils.classForName(childMainClass)
    mainMethod.invoke(null, childArgs.toArray)  实质就是client.main
       val args = new ClientArguments(argStrings)
       new Client(args, sparkConf).run()
       this.appId = client.submitApplication()
         containerContext = xx
         appContext = xx
         yarnClient.submitApplication(appContext)
可以看到,提交代码的实质是 Client的使用,所以用户可以不用spark-subumit,在自己项目代码里直接使用Client 对象提交spark 任务java提交spark任务到yarn平台
提交到YARN集群后,YARN操作
既然是来启动AM的,所以就先创建一个AM,并且执行了master.run()
// spark/yarn/src/main/scala/org/apache/spark/deploy/yarn/ApplicationMaster.scala
object ApplicationMaster extends Logging {
  private var master: ApplicationMaster = _
  def main(args: Array[String]): Unit = {
    SignalUtils.registerLogger(log)
    val amArgs = new ApplicationMasterArguments(args)
    SparkHadoopUtil.get.runAsSparkUser { () =>
      master = new ApplicationMaster(amArgs, new YarnRMClient)
      System.exit(master.run())
    }
  }
}
// spark/yarn/src/main/scala/org/apache/spark/deploy/yarn/ApplicationMaster.scala
private[spark] class ApplicationMaster(args: ApplicationMasterArguments,client: YarnRMClient)extends Logging {
  private val sparkConf = new SparkConf()
  private val yarnConf: YarnConfiguration = SparkHadoopUtil.get.newConfiguration(sparkConf).asInstanceOf[YarnConfiguration]
  private val isClusterMode = args.userClass != null

  // 仅保留 cluster mode 下的代码
  final def run(): Int = {
    val appAttemptId = client.getAttemptId()
    var attemptID: Option[String] = None

    System.setProperty("spark.ui.port", "0")
    System.setProperty("spark.master", "yarn")
    System.setProperty("spark.submit.deployMode", "cluster")
    System.setProperty("spark.yarn.app.id", appAttemptId.getApplicationId().toString())
    attemptID = Option(appAttemptId.getAttemptId.toString)

    new CallerContext("APPMASTER",Option(appAttemptId.getApplicationId.toString), attemptID).setCurrentContext()
    logInfo("ApplicationAttemptId: " + appAttemptId)
    val fs = FileSystem.get(yarnConf)	// 创建HDFS文件系统
    runDriver(securityMgr)				    // Driver的执行
    exitCode
  }
  private def runDriver(securityMgr: SecurityManager): Unit = {
    addAmIpFilter()
    userClassThread = startUserApplication()	// 启动了用户类线程

    logInfo("Waiting for spark context initialization...")
    val sc = ThreadUtils.awaitResult(sparkContextPromise.future,Duration(totalWaitTime, TimeUnit.MILLISECONDS))
    rpcEnv = sc.env.rpcEnv
    val driverRef = runAMEndpoint(sc.getConf.get("spark.driver.host"),sc.getConf.get("spark.driver.port"),isClusterMode = true)
    registerAM(sc.getConf, rpcEnv, driverRef, sc.ui.map(_.appUIAddress).getOrElse(""),securityMgr) // 向RM注册AM,向RM申请资源
    userClassThread.join()
  }
  private def startUserApplication(): Thread = {
    logInfo("Starting the user application in a separate Thread")

    val classpath = Client.getUserClasspath(sparkConf)
    val urls = classpath.map { entry =>
      new URL("file:" + new File(entry.getPath()).getAbsolutePath())
    }
    val userClassLoader = xx
    var userArgs = args.userArgs
    val mainMethod = userClassLoader.loadClass(args.userClass).getMethod("main", classOf[Array[String]])

    val userThread = new Thread {
      override def run() {
        mainMethod.invoke(null, userArgs.toArray) // 用类加载器的方式来加载用户类的main方法,并且,为这个线程设置名称为"Driver"
        finish(FinalApplicationStatus.SUCCEEDED, ApplicationMaster.EXIT_SUCCESS)
      }
    }
    userThread.setContextClassLoader(userClassLoader)
    userThread.setName("Driver")
    userThread.start()
    userThread
  }
  private def registerAM(_sparkConf: SparkConf,_rpcEnv: RpcEnv,driverRef: RpcEndpointRef,uiAddress: String,securityMgr: SecurityManager) = {
    val appId = client.getAttemptId().getApplicationId().toString()
    val attemptId = client.getAttemptId().getAttemptId().toString()

    val driverUrl = RpcEndpointAddress(_sparkConf.get("spark.driver.host"),_sparkConf.get("spark.driver.port").toInt,CoarseGrainedSchedulerBackend.ENDPOINT_NAME).toString

    allocator = client.register(driverUrl,driverRef,yarnConf,_sparkConf,uiAddress,historyAddress,securityMgr,localResources)
    allocator.allocateResources()   //让RM为AM分配资源
    reporterThread = launchReporterThread()
  }
}
让RM为AM分配资源,获取资源容器,启动runAllocatedContainers(containersToUse),就是在这个Container里面运行ExecutorBackend
// spark/yarn/src/main/scala/org/apache/spark/deploy/yarn/YarnAllocator.scala
private[yarn] class YarnAllocator(driverUrl: String,driverRef: RpcEndpointRef,conf: YarnConfiguration,sparkConf: SparkConf,amClient: AMRMClient[ContainerRequest],...)extends Logging {
  def allocateResources(): Unit = synchronized {
    val allocateResponse = amClient.allocate(progressIndicator)
    val allocatedContainers = allocateResponse.getAllocatedContainers() // 获取容器
    if (allocatedContainers.size > 0) { // 获取容器的大小
      handleAllocatedContainers(allocatedContainers.asScala)  // 处理获取到的容器
    }
  }
  def handleAllocatedContainers(allocatedContainers: Seq[Container]): Unit = {
    val containersToUse = new ArrayBuffer[Container](allocatedContainers.size)
	  // 计算获取到的资源中有没有一个 host、 机架/rack 的
    // Match incoming requests by host
    val remainingAfterHostMatches = new ArrayBuffer[Container]
    for (allocatedContainer <- allocatedContainers) {...}
    // Match remaining by rack
    val remainingAfterRackMatches = new ArrayBuffer[Container]
    for (allocatedContainer <- remainingAfterHostMatches) {...}
    // Assign remaining that are neither node-local nor rack-local
    val remainingAfterOffRackMatches = new ArrayBuffer[Container]
    for (allocatedContainer <- remainingAfterRackMatches) {...}
    runAllocatedContainers(containersToUse)	// 在这个Container里面运行ExecutorBackend
    logInfo("Received %d containers from YARN, launching executors on %d of them.".format(allocatedContainers.size, containersToUse.size))
  }
  private def runAllocatedContainers(containersToUse: ArrayBuffer[Container]): Unit = {
    for (container <- containersToUse) {
      val executorId = executorIdCounter.toString
      if (numExecutorsRunning < targetNumExecutors) {
        launcherPool.execute(new Runnable {
          override def run(): Unit = {
            new ExecutorRunnable(Some(container),conf,sparkConf,driverUrl,executorId,...).run()
            updateInternalState()
          }
        })
      }
    }
  }
}
startContainer 实际命令是 /bin/java org.apache.spark.executor.CoarseGrainedExecutorBackend
private[yarn] class ExecutorRunnable(container: Option[Container],conf: YarnConfiguration,sparkConf: SparkConf,masterAddress: String,executorId: String,...) extends Logging {
  def run(): Unit = {
    logDebug("Starting Executor Container")
    nmClient = NMClient.createNMClient()
    nmClient.init(conf)
    nmClient.start()
    startContainer()
  }
  def startContainer(): java.util.Map[String, ByteBuffer] = {
    val ctx = Records.newRecord(classOf[ContainerLaunchContext]).asInstanceOf[ContainerLaunchContext]
    val env = prepareEnvironment().asJava

    ctx.setLocalResources(localResources.asJava)
    ctx.setEnvironment(env)

    val credentials = UserGroupInformation.getCurrentUser().getCredentials()
    val dob = new DataOutputBuffer()
    credentials.writeTokenStorageToStream(dob)
    ctx.setTokens(ByteBuffer.wrap(dob.getData()))
    val commands = prepareCommand()
    ctx.setCommands(commands.asJava)
    ctx.setApplicationACLs(YarnSparkHadoopUtil.getApplicationAclsForYarn(securityMgr).asJava)
    // Send the start request to the ContainerManager
    nmClient.startContainer(container.get, ctx)
  }
}
提交到YARN集群,YARN操作
- 运行ApplicationMaster的run方法;
- 设置好相关的环境变量。
- 创建amClient,并启动;
- 在startUserClass函数专门启动了一个线程(名称为Driver的线程)来启动用户提交的Application,也就是启动了Driver。在Driver中将会初始化SparkContext;
- 等待SparkContext初始化完成,最多等待spark.yarn.applicationMaster.waitTries次数(默认为10),如果等待了的次数超过了配置的,程序将会退出;否则用SparkContext初始化yarnAllocator;
- 当SparkContext、Driver初始化完成的时候,通过amClient向ResourceManager注册ApplicationMaster
- 分配并启动Executeors。在启动Executeors之前,先要通过yarnAllocator获取到numExecutors个Container,然后在Container中启动Executeors。启动Executeors是通过ExecutorRunnable实现的,而ExecutorRunnable内部是启动CoarseGrainedExecutorBackend的。
- 最后,Task将在CoarseGrainedExecutorBackend里面运行,然后运行状况会通过Akka通知CoarseGrainedScheduler,直到作业运行完成。
Excutor端向Driver注册
Spark YarnCluster源码分析(二)之提交任务2+切分任务
CoarseGrainedExecutorBackend继承了extends ThreadSafeRpcEndpoint,所以说这个类也是一个Endpoint。既然这个类为EndPoint,所以它也要构建环境(RpcEnv.create),还需要把自己设置为节点(env.rpcEnv.setupEndpoint),按照生命周期,接下来该运行onStart(),因为使用的是ask,所以应该由CoarseGrainedSchedulerBackend类中的receiveAndReply()方法来进行接收(最后由CoarseGrainedExecutorBackend类的receive()方法接收)。
// spark/core/src/main/scala/org/apache/spark/executor/CoarseGrainedExecutorBackend.scala
private[spark] object CoarseGrainedExecutorBackend extends Logging {
  // 主要是对参数的赋值
  def main(args: Array[String]) {
    var driverUrl: String = null
    var executorId: String = null
    var hostname: String = null
    var cores: Int = 0
    var appId: String = null
    var workerUrl: Option[String] = None
    val userClassPath = new mutable.ListBuffer[URL]()
    var argv = args.toList
    // 用argv 给上述变量赋值
    run(driverUrl, executorId, hostname, cores, appId, workerUrl, userClassPath)
    System.exit(0)
  }
  private def run(driverUrl: String,executorId: String,hostname: String,cores: Int,appId: String,workerUrl: Option[String],userClassPath: Seq[URL]) {
    SparkHadoopUtil.get.runAsSparkUser { () =>
      // Bootstrap to fetch the driver's Spark properties.
      val executorConf = new SparkConf
      val port = executorConf.getInt("spark.executor.port", 0)
      val fetcher = RpcEnv.create("driverPropsFetcher",hostname,port,executorConf,new SecurityManager(executorConf),clientMode = true)
      val driver = fetcher.setupEndpointRefByURI(driverUrl)
      val cfg = driver.askWithRetry[SparkAppConfig](RetrieveSparkAppConfig)
      val props = cfg.sparkProperties ++ Seq[(String, String)](("spark.app.id", appId))
      fetcher.shutdown()

      // Create SparkEnv using properties we fetched from the driver.
      val driverConf = new SparkConf()
      for ((key, value) <- props) {
        // this is required for SSL in standalone mode
        if (SparkConf.isExecutorStartupConf(key)) {
          driverConf.setIfMissing(key, value)
        } else {
          driverConf.set(key, value)
        }
      }
      val env = SparkEnv.createExecutorEnv(driverConf, executorId, hostname, port, cores, cfg.ioEncryptionKey, isLocal = false)
      env.rpcEnv.setupEndpoint("Executor", new CoarseGrainedExecutorBackend(env.rpcEnv, driverUrl, executorId, hostname, cores, userClassPath, env))
      workerUrl.foreach { url =>
        env.rpcEnv.setupEndpoint("WorkerWatcher", new WorkerWatcher(env.rpcEnv, url))
      }
      env.rpcEnv.awaitTermination()
      SparkHadoopUtil.get.stopCredentialUpdater()
    }
  }
}
excutor端向Driver端进行注册(CoarseGrainedExecutorBackend.onStart),注册成功后,Driver端向excutord端发送任务(CoarseGrainedExecutorBackend.receive),excutor端进行执行。
private[spark] class CoarseGrainedExecutorBackend(override val rpcEnv: RpcEnv,driverUrl: String,executorId: String,hostname: String,...)extends ThreadSafeRpcEndpoint with ExecutorBackend with Logging {
  override def onStart() {
    logInfo("Connecting to driver: " + driverUrl)
    rpcEnv.asyncSetupEndpointRefByURI(driverUrl).flatMap { ref =>
      // This is a very fast action so we can use "ThreadUtils.sameThread"
      driver = Some(ref)
      ref.ask[Boolean](RegisterExecutor(executorId, self, hostname, cores, extractLogUrls))
    }(ThreadUtils.sameThread).onComplete {
      // This is a very fast action so we can use "ThreadUtils.sameThread"
      case Success(msg) =>
        // Always receive `true`. Just ignore it
      case Failure(e) =>
        exitExecutor(1, s"Cannot register with driver: $driverUrl", e, notifyDriver = false)
    }(ThreadUtils.sameThread)
  }
  override def receive: PartialFunction[Any, Unit] = {
    case RegisteredExecutor =>
      logInfo("Successfully registered with driver")
      executor = new Executor(executorId, hostname, env, userClassPath, isLocal = false)  // 创建Excutor
    case RegisterExecutorFailed(message) =>
      exitExecutor(1, "Slave registration failed: " + message)
    case LaunchTask(data) =>
      ...
    case KillTask(taskId, _, interruptThread) =>
      ...
    case StopExecutor =>
      ...
    case Shutdown =>
      ...
  }
}
Task任务的划分的源码分析
那么Driver端既然要向excutor端发送任务,就得先进行任务的切分,这就不得不提到RDD,我们知道在spark中,算子只有在遇到action算子才会执行(如collect()),转换算子都是懒加载,所以要想知道Task任务怎么划分的,得先从action算子看起,我们下面以WordCount项目为例:
dataRDD.flatMap(_.split(" ")).map((_,1)).reduceByKey(_ + _).collect()
每一个 Actions 算子都会触发 SparkContext 的 runJob 函数调用,从而开启一段分布式调度之旅。SparkContext.runJob 主要作用是调用 DAGScheduler 的 runJob 函数。
// spark/core/src/main/scala/org/apache/spark/rdd/RDD.scala
abstract class RDD[T: ClassTag]( @transient private var _sc: SparkContext, @transient private var deps: Seq[Dependency[_]]) extends Serializable with Logging {
  def collect(): Array[T] = withScope {
    val results = sc.runJob(this, (iter: Iterator[T]) => iter.toArray)
    Array.concat(results: _*)
  }
}
// spark/core/src/main/scala/org/apache/spark/SparkContext.scala
class SparkContext(config: SparkConf) extends Logging {
  def runJob[T, U: ClassTag](rdd: RDD[T],func: (TaskContext, Iterator[T]) => U,partitions: Seq[Int],resultHandler: (Int, U) => Unit): Unit = {
    val callSite = getCallSite
    val cleanedFunc = clean(func)
    logInfo("Starting job: " + callSite.shortForm)
    dagScheduler.runJob(rdd, cleanedFunc, partitions, callSite, resultHandler, localProperties.get)
    progressBar.foreach(_.finishAll())
    rdd.doCheckpoint()
  }
}
// spark/core/src/main/scala/org/apache/spark/scheduler/DAGScheduler.scala
private[spark]
class DAGScheduler(private[scheduler] val sc: SparkContext,private[scheduler] val taskScheduler: TaskScheduler,env: SparkEnv,...)extends Logging {
  // Run an action job on the given RDD and pass all the results to the resultHandler function as they arrive.
  def runJob[T, U](rdd: RDD[T],func: (TaskContext, Iterator[T]) => U,partitions: Seq[Int],callSite: CallSite,resultHandler: (Int, U) => Unit,properties: Properties): Unit = {
    val start = System.nanoTime
    val waiter = submitJob(rdd, func, partitions, callSite, resultHandler, properties)
    val awaitPermission = null.asInstanceOf[scala.concurrent.CanAwait]
    waiter.completionFuture.ready(Duration.Inf)(awaitPermission)
    waiter.completionFuture.value.get match {
      case scala.util.Success(_) =>
        logInfo("Job %d finished: %s, took %f s".format(waiter.jobId, callSite.shortForm, (System.nanoTime - start) / 1e9))
      case scala.util.Failure(exception) =>
        logInfo("Job %d failed: %s, took %f s".format(waiter.jobId, callSite.shortForm, (System.nanoTime - start) / 1e9))
        ...
    }
  }
  // Submit an action job to the scheduler.
  def submitJob[T, U](rdd: RDD[T],func: (TaskContext, Iterator[T]) => U,partitions: Seq[Int],callSite: CallSite,resultHandler: (Int, U) => Unit,properties: Properties): JobWaiter[U] = {
    val jobId = nextJobId.getAndIncrement()
    val func2 = func.asInstanceOf[(TaskContext, Iterator[_]) => _]
    val waiter = new JobWaiter(this, jobId, partitions.size, resultHandler)
    eventProcessLoop.post(JobSubmitted(jobId, rdd, func2, partitions.toArray, callSite, waiter,SerializationUtils.clone(properties))) // 发送一个提交任务的作业 ==> eventProcessLoop.onReceive ==> eventProcessLoop.doOnReceive ==> dagScheduler.handleJobSubmitted
    waiter
  }
  private[scheduler] def handleJobSubmitted(jobId: Int,finalRDD: RDD[_],func: (TaskContext, Iterator[_]) => _,partitions: Array[Int],callSite: CallSite,listener: JobListener,properties: Properties) {
    var finalStage: ResultStage = null
    // New stage creation may throw an exception if, for example, jobs are run on a HadoopRDD whose underlying HDFS files have been deleted.
    finalStage = createResultStage(finalRDD, func, partitions, jobId, callSite) // 先创建最终stage
    val job = new ActiveJob(jobId, finalStage, callSite, listener, properties)
    clearCacheLocs()
    logInfo("Got job %s (%s) with %d output partitions".format(job.jobId, callSite.shortForm, partitions.length))
    logInfo("Final stage: " + finalStage + " (" + finalStage.name + ")")
    logInfo("Parents of final stage: " + finalStage.parents)
    logInfo("Missing parents: " + getMissingParentStages(finalStage))

    val jobSubmissionTime = clock.getTimeMillis()
    jobIdToActiveJob(jobId) = job
    activeJobs += job
    finalStage.setActiveJob(job)
    val stageIds = jobIdToStageIds(jobId).toArray
    val stageInfos = stageIds.flatMap(id => stageIdToStage.get(id).map(_.latestInfo))
    listenerBus.post(SparkListenerJobStart(job.jobId, jobSubmissionTime, stageInfos, properties))
    submitStage(finalStage)   // 提交任务的最终stage
  }
  // Submits stage, but first recursively submits any missing parents.
  private def submitStage(stage: Stage) {
    val jobId = activeJobForStage(stage)
    logDebug("submitStage(" + stage + ")")
    if (!waitingStages(stage) && !runningStages(stage) && !failedStages(stage)) {
      val missing = getMissingParentStages(stage).sortBy(_.id)
      logDebug("missing: " + missing)
      if (missing.isEmpty) {
        logInfo("Submitting " + stage + " (" + stage.rdd + "), which has no missing parents")
        submitMissingTasks(stage, jobId.get)
      } else {
        for (parent <- missing) {
          submitStage(parent)
        }
        waitingStages += stage
      }
    }
  }
}
深入浅出 Spark(三):Spark 调度系统之“权力的游戏”runJob 通过调用 submitJob 向 EventProcessLoop 递交 JobSubmitted 事件,EventProcessLoop 则调用 DAGScheduler 的 handleJobSubmitted 方法以递归的方式创建所有 Stages。Stages 创建完毕后,通过调用 submitStage 来提交 ResultStage。值得注意的是,在 submitStage 中,DAGScheduler 会先检查待执行 Stage 所依赖的父 Stages 是否已执行完毕,如果没有则递归地提请执行所有未执行的父 Stages。对于当下需要执行的 Stage,调用 submitMissingTasks 提请进行任务调度。submitMissingTasks 是这段代码调用的关键,主要进行如下 4 项操作:
- 计算每一个 missing task 的位置偏好(这个时候就需要 BlockManagerMaster 来打配合)
- 根据 Stage 类型的不同分别创建 ShuffleMapTask 和 ResultTask
- 创建 TaskSet(注意,TaskSet 由 DAGScheduler 创建,而可调度对象 TaskSetManager 则由 TaskScheduler 创建)
- 调用 TaskScheduler 的 submitTasks 方法提交刚刚创建的 TaskSet
对于划分的每一个 Stage,DAGScheduler 会为之创建对应的任务集合 TaskSet(RDD ==> stage ==> Task,RDD 最终落地为 Task)。DAGScheduler 以 TaskSet 为粒度向 TaskScheduler 提交任务调度请求。
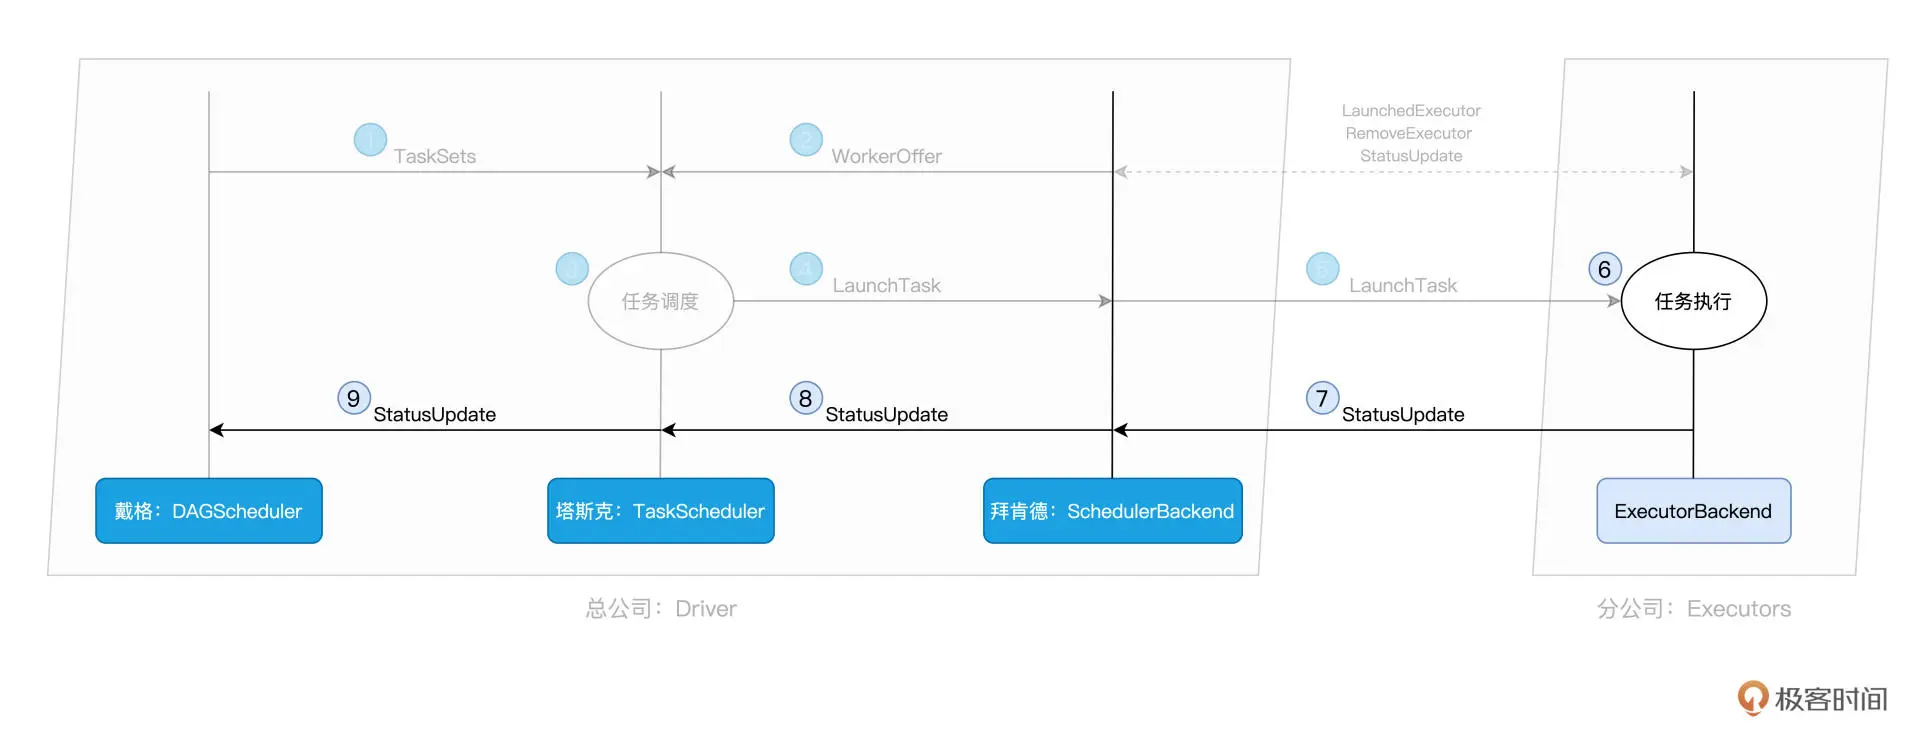
TaskScheduler 接收到 DAGScheduler 创建的 TaskSet 后,创建 TaskSetManager,SchedulableBuilder 即调用 addTaskSetManager 方法将刚刚创建的 TaskSetManager 追加到任务队列中。TaskScheduler 请求分布式计算资源, SchedulerBackend 搜集可用计算资源,并以 Worker Offers 的形式反馈给 TaskScheduler,TaskScheduler 根据获得的 Worker Offers,根据调度规则(FIFO 或 Fair)和本地性的限制,搜集适合调度的任务集合,并以 TaskDescriptions 的形式反馈给 SchedulerBackend, 对于获取到的 TaskDescriptions,SchedulerBackend 将其中封装的任务代码分发到对应的 Executors 上,开启分布式任务执行流程。
回顾一下drvier流程: Actions 算子触发 SparkContext.runJob ==> DAGScheduler.runJob ==> DAGScheduler.submitJob == EventProcessLoop/ JobSubmitted event ==> DAGScheduler.handleJobSubmitted 创建所有stage ==> DAGScheduler.submitStage ==> DAGScheduler.submitMissingTasks 创建TaskSet ==> TaskScheduler.submitTasks ==> 为TaskSet 创建TaskSetManager 并加入任务队列,向SchedulerBackend 请求资源,拿到 Worker Offers ==> 计算TaskDescriptions 并发给 SchedulerBackend,SchedulerBackend 分发TaskDescriptions 中的任务代码到 Executors 上。
Executors在接收到 LaunchTask 消息后立即调用 Executor 的 launchTask 方法开始干活。launchTask 首先把 TaskDescription 封装为 TaskRunner(TaskRunner 实现了 Java Runnable 接口,用于多线程并发),随即将封装好的 TaskRunner 交由 Executor 线程池,线程池则调用 TaskRunner 的 run 方法来执行任务。TaskRunner 先对 TaskDescription 中的 serializedTask 进行反序列化得到 Task;然后,为该 Task 指定内存管理器 MemoryManager,MemoryManager 维护一个 Executor 中所有 Tasks 的内存占用以及回收情况。接着调用 Task 的 run 方法来执行任务并获取任务结果,TaskRunner 最终将任务结果封装为 DirectTaskResult 或 IndirectTaskResult 并通过调用 ExecutorBackend 的 statusUpdate 方法将执行状态和结果返回。
与tf 对比起来看
- tf 是静态图执行,client侧算子的实现是 拼接完整的graphDef,而spark 算子的实现则更像动态图立即执行(eager mode),只是转换算子是惰性计算。
- tf 每一个worker 可能跑的是完整的graphDef (数据并行模式下),spark 的每一个executor 只跑一个Stage 下的Task。
- tf 下的每一个op 只是一个名字,具体实现worker 根据名字找到 对应的kernel 执行,spark 则直接将 task 序列化分发到 executor(毕竟java 对象只是一个
byte[])