简介
访问安全就是防止人恶意使用,笔者在公司操作物理机、k8s 集群,都是用一个受限的账号,除了查询外, 很多操作要通过运维执行。
火得一塌糊涂的kubernetes有哪些值得初学者学习的? Kubernetes 是透明的,它没有隐藏的内部 API。换句话说 Kubernetes 系统内部用来交互的 API 和我们用来与 Kubernetes 交互的 API 相同。这样做的好处是,当 Kubernetes 默认的组件无法满足我们的需求时,我们可以利用已有的 API 实现我们自定义的特性。
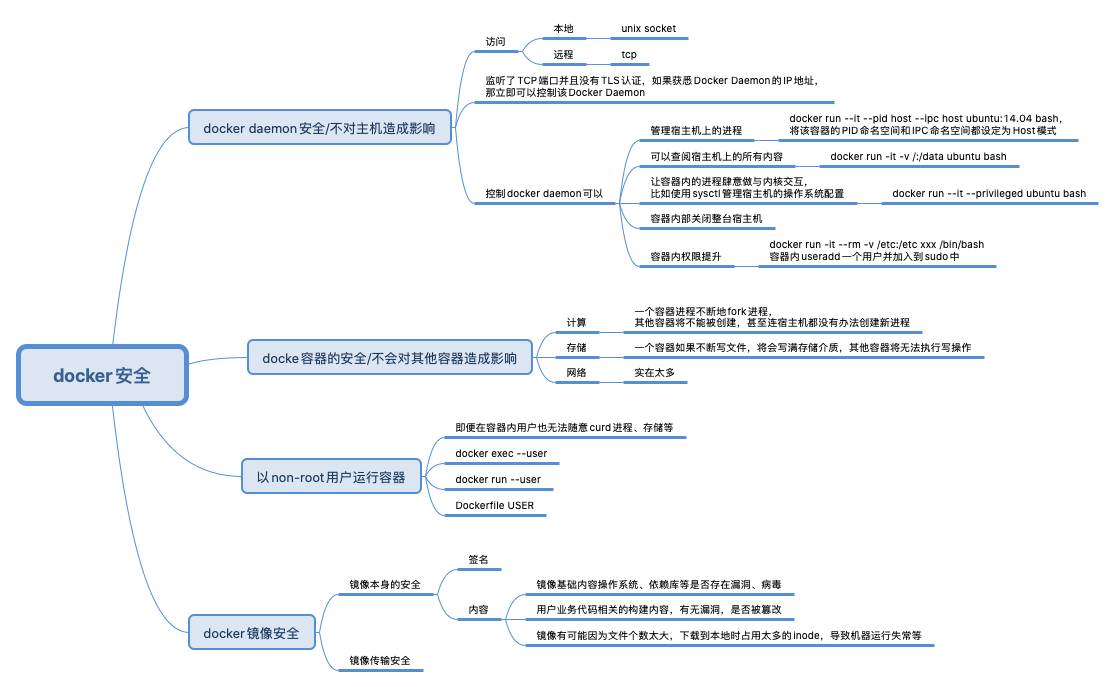
docker 安全
最典型的例子,将/etc 等核心文件 挂载到容器中,在容器中进行改写等。

Linux capabilities(有点k8s sa 的味道了)
- 在 Linux capabilities 出现前,进程的权限可以简单分为两类:特权用户的进程(id=0);非特权用户的进程(id>0)
- 从 kernel 2.2 开始,Linux 把特权用户所有的这些“特权”做了更详细的划分,这样被划分出来的每个单元就被称为 capability。比如说,运行 iptables 命令,对应的进程需要有 CAP_NET_ADMIN 这个 capability。如果要 mount 一个文件系统,那么对应的进程需要有 CAP_SYS_ADMIN 这个 capability。
- 在普通 Linux 节点上,非 root 用户启动的进程缺省没有任何 Linux capabilities,而 root 用户启动的进程缺省包含了所有的 Linux capabilities。对于 root 用户启动的进程,如果把 CAP_NET_ADMIN 这个 capability 移除(
capsh --keep=1 --user=root --drop=cap_net_admin),它就不可以运行 iptables。 - 新运行的进程里的相关 capabilities 参数的值,是由它的父进程以及程序文件中的 capabilities 参数值计算得来的(文件中可以设置 capabilities 参数值(以ping 为例,
getcap $(which ping)/setcap -r $(which ping)),并且这个值会影响到最后运行它的进程)。如果把 iptables 的应用程序加上 CAP_NET_ADMIN 的 capability,那么即使是非 root 用户也有执行 iptables 的权限了。 - 因为安全方面的考虑,容器缺省启动的时候,哪怕是容器中 root 用户的进程,系统也只允许了 15 个 capabilities。Privileged 的容器也就是允许容器中的进程可以执行所有的特权操作。如果我们发现容器中进程的权限不够,就需要分析它需要的最小 capabilities 集合,而不是直接赋予容器”privileged”。
docker 多用户
作为容器中的 root,它还是可以有一些 Linux capabilities,那么在容器中还是可以执行一些特权的操作。怎么办呢?
可以给容器指定一个普通用户。docker run -ti --name root_example -u 6667:6667 -v /etc:/mnt centos bash 或者在创建镜像时,加入USER $username。这样做的缺点是:用户 uid 是整个节点中共享的,比如说,多个客户在建立自己的容器镜像的时候都选择了同一个 uid 6667。那么当多个客户的容器在同一个节点上运行的时候,其实就都使用了宿主机上 uid 6667。在一台 Linux 系统上,每个用户下的资源是有限制的,比如打开文件数目(open files)、最大进程数目(max user processes)等等。一旦有很多个容器共享一个 uid,这些容器就很可能很快消耗掉这个 uid 下的资源,这样很容易导致这些容器都不能再正常工作。
也可以使用User Namespace(一些组件默认不启用),User Namespace 隔离了一台 Linux 节点上的 User ID(uid)和 Group ID(gid),它给 Namespace 中的 uid/gid 的值与宿主机上的 uid/gid 值建立了一个映射关系。经过 User Namespace 的隔离,我们在 Namespace 中看到的进程的 uid/gid,就和宿主机 Namespace 中看到的 uid 和 gid 不一样了。比如podman run -ti -v /etc:/mnt --uidmap 0:2000:1000 centos bash,第一个 0 是指在新的 Namespace 里 uid 从 0 开始,中间的那个 2000 指的是 Host Namespace 里被映射的 uid 从 2000 开始,最后一个 1000 是指总共需要连续映射 1000 个 uid。这个容器里的 uid 0 是被映射到宿主机上的 uid 2000 的,把容器中 root 用户(uid 0)映射成宿主机上的普通用户。
rootless container 中的”rootless”不仅仅指容器中以非 root 用户来运行进程,还指以非 root 用户来创建容器,管理容器。也就是说,启动容器的时候,Docker 或者 podman 是以非 root 用户来执行的。
k8s访问权限控制
认证/Authentication
面向对象
认证的过程即是证明user身份的过程。Kubernetes中有两类用户:
- ServiceAccount账户是由Kubernetes提供API(资源)进行创建和管理的,ServiceAccount可以认为是特殊的Secret资源(创建一个ServiceAccount 默认会创建一个Secret),可作为用户集群内资源访问APIServer的认证所用。可以通过mount的方式挂载到Pod内进行使用。
- 真实的用户通常是从外部发起请求访问APIServer,由管理员管理认证凭证,而Kubernetes本身不管理任何的用户和凭证信息的,即所有的用户都是逻辑上的用户,无法通过API调用Kubernetes API进行创建真实用户。
- User accounts are for humans. Service accounts are for processes, which run in pods.
- User accounts are intended to be global. Names must be unique across all namespaces of a cluster, future user resource will not be namespaced. Service accounts are namespaced.
认证方式/“来者何人”
说说Kubernetes的访问控制实现方式Kubernetes 各组件都是以 APIServer 作为网关通信的。为了安全,APIServer 一般通过 TLS 认证对外暴露,集群组件若要访问 APIServer 则需要相应的 TLS 证书。APIServer 本身支持多种认证方式,并不只是 TLS 一种,默认我们使用 TLS 认证。APIServer 和集群组件通信使用 TLS 双向认证,顾名思义,客户端和服务器端都需要验证对方的身份,相比单向认证,双向认证客户端除了需要从服务器端下载服务器的公钥证书进行验证外,还需要把客户端的公钥证书上传到服务器端给服务器端进行验证,等双方都认证通过了,才开始建立安全通信通道进行数据传输
APIServer启动时,可以指定一种或多种Authentication方法,如果指定了多种方法,那么APIServer将会逐个使用这些方法对客户端请求进行验证,只要通过其中一种方法的验证,APIServer就会认为Authentication成功;
| APIServer启动参数 | 请求 | |
|---|---|---|
| Basic Authentication | csv文件--basic-auth-file=SOMEFILE |
HTTP Header中Authentication为Basic,并跟上Base64Encode(user:passward)值 |
| x509 客户端证书 | --client-ca-file=SOMEFILE |
|
| Bearer Token(有多种方式) | csv文件--token-auth-file=SOMEFILE |
HTTP Header中Authentication为Bearer,并跟上Base64Encode(user:passward)值 |
| Webhook Token Server | --authentication-token-webhook-config-file--authentication-token-webhook-cache-ttl |
以我们常用的kubectl 工作所需的 kubeconfig 文件为例,user 可以配置 tls 方式:client-certificate-data+client-key-data,也可以配置token 方式
apiVersion: v1
kind: Config
users:
  - name: example
    user:
        client-certificate-data: xx
        client-key-data: xx
token 方式
apiVersion: v1
kind: Config
users:
  - name: example
    user:
        token: xx
实现细节
k8s任何的认证方式都是以下Interface的实现方式
// Request attempts to extract authentication information from a request and returns
// information about the current user and true if successful, false if not successful,
// or an error if the request could not be checked.
type Request interface {
   AuthenticateRequest(req *http.Request) (user.Info, bool, error)
}
都是接收http Request请求,然后会返回一个user.Info的结构体,一个bool,以及一个error。
- user.Info中包含了用户的信息,包括UserName、UUID、Group、Extra。
- bool返回了用户是否通过认证,false的话即返回无法通过认证,即返回401错误。
- error则返回了当Request无法被检查的错误,如果遇到错误则会继续进行下一种注册的方式进行认证。 如果认证通过,则会把user.Info写入到到请求的context中,后续请求过程可以随时获取用户信息,比如授权时进行鉴权。
若APIServer开启Webhook Token Server进行认证校验,则在接受到用户的Request之后,会包装Bearer Token成一个TokenReview发送给WebHookServer,Server端接收到之后会进行校验,并返回TokenReview接口,在status字段中进行反馈是否通过校验通过和user.Info信息。
授权/Authorization/“有没有权”
认证之后我们如何在认证基础上针对资源授权管理呢?授权就是判断user是否拥有操作资源的相应权限。
这个阶段面对的输入是http request context中的各种属性,包括:user、group、request path(比如:/api/v1、/healthz、/version等)、request verb(比如:get、list、create等)。APIServer会将这些属性值与事先配置好的访问策略(access policy)相比较。APIServer支持多种authorization mode,包括AlwaysAllow、AlwaysDeny、ABAC、RBAC和Webhook。APIServer启动时,可以指定一种或多种authorization mode,和认证一样,只要有一种鉴权模块通过,即可返回资源。
-
RBAC, Kubernetes提供ClusterRole、Role资源,分别对应集群维度、Namespace维度角色权限管控,用户可以自定义相应的ClusterRole、Role资源,绑定到已经认证的User之上。下例中 通过认证模块到达授权模块的requestInfo中userInfo信息是alex的请求,在授权模块中走到RBAC授权模块时,则会进行查询集群的Role/RoleBinding、ClusterRole/ClusterRoleBinding信息。进行判断是否拥有context相应操作的权限。
apiVersion: rbac.authorization.k8s.io/v1 kind: ClusterRole metadata: name: tke:pod-reader rules: - apiGroups: [""] # "" 指定核心 API 组 resources: ["pods"] verbs: ["get", "watch", "list"] --- apiVersion: rbac.authorization.k8s.io/v1 # 此角色绑定使得用户 "alex" 能够读取 "default" 命名空间中的 Pods kind: ClusterRoleBinding metadata: name: alex-ClusterRole subjects: - kind: User name: alex apiGroup: rbac.authorization.k8s.io roleRef: kind: ClusterRole name: tke:pod-reader # 这里的名称必须与你想要绑定的 Role 或 ClusterRole 名称一致 apiGroup: rbac.authorization.k8s.io -
WebHook, Webhook模式是一种基于HTTP回调的方式,通过配置好授权webhook server地址。当APIServer接收到request的时候,会进行包装SubjectAccessReview请求Webhook Server,Webhook Server会进行判断是否可以访问,然后返回allow信息。
准入控制/“事能不能干”
apiserver 确定了来者身份,也确定了有权操作,但也不能恣意妄为。比如volcano 的webhook会拦截create pod请求,找不到相关的podgroup则拒绝create pod,确保podgroup先于pod 创建成功。
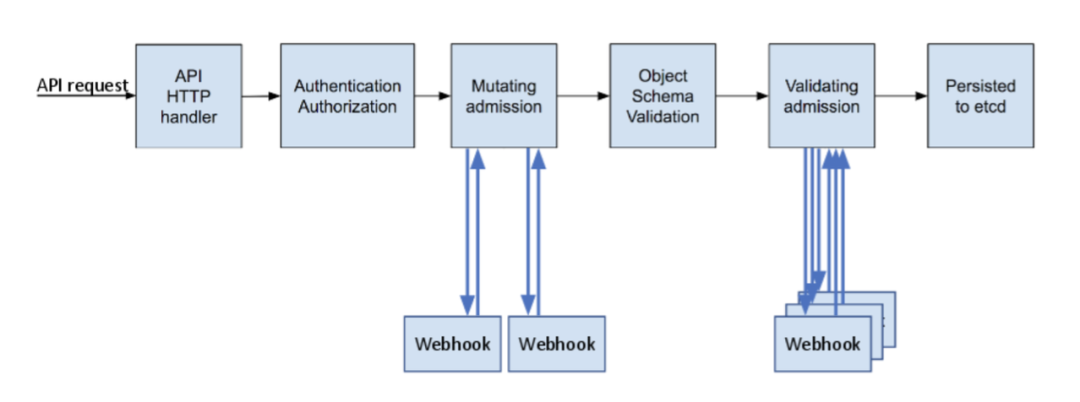
从技术的角度看,Admission control就像a chain of interceptors(拦截器链模式),它拦截那些已经顺利通过authentication和authorization的http请求。http请求沿着APIServer启动时配置的admission control chain顺序逐一被拦截和处理,如果某个interceptor拒绝了该http请求,那么request将会被直接reject掉,而不是像authentication或authorization那样有继续尝试其他interceptor的机会。

K8s支持30多种admission control 插件,其中有两个具有强大的灵活性,即ValidatingAdmissionWebhooks和MutatingAdmissionWebhooks,这两种控制变换和准入以Webhook的方式提供给用户使用,大大提高了灵活性,用户可以在集群创建自定义的AdmissionWebhookServer进行调整准入策略。
安全相关的 kubernetes objects
Secrets——非明文的configmap
- 为什么弄一个Secrets?
- 其它组件(主要是Pod)如何获取Secrets数据?
为什么要弄一个Secrets? Kubernetes secret objects let you store and manage sensitive information, such as passwords, OAuth tokens, and ssh keys. Putting this information in a secret is safer and more flexible than putting it verbatim(原样的) in a Pod Lifecycle definition or in a container image . 管理敏感信息,如果没有Secrets,这些信息可能被保存在 pod 定义或者 docker 镜像中,有信息泄露的风险(PS:笔者曾把密码写在代码测试类里提交到公司仓库, 结果被几个看源码的小哥发现并使用了)
K8s Secrets 中保存的数据都必须经过 base64加密
apiVersion: v1
kind: Secret
metadata:
    name: db-secret
    type: Opaque
    data:
        # base64
        carrot-db-username: Y2Fycm90
        carrot-db-password: Y2Fycm90
Secrets can be mounted as data volumes or be exposed as environment variables to be used by a container in a pod
- volume 方式, Each key in the secret data map becomes the filename under mountPath. 每一个secret key 会变成 container mountPath 下的一个文件。When a secret being already consumed in a volume is updated, projected keys are eventually updated as well. Kubelet is checking whether the mounted secret is fresh on every periodic sync. 当你改了secret 数据,则容器内的文件内容也能自动同步
- Environment Variables
Service Accounts——让pod 可以访问apiserver
配置
配置 Pod 的 Service Account service account 只是提供了一个类似用户名的标识,真正ServiceAccount 有哪些权限要 通过 ClusterRoleBinding 绑定 ClusterRole。
A service account provides an identity for processes that run in a Pod. When you (a human) access the cluster (for example, using kubectl), you are authenticated by the apiserver as a particular User Account (currently this is usually admin, unless your cluster administrator has customized your cluster). Processes in containers inside pods can also contact the apiserver. When they do, they are authenticated as a particular Service Account (for example, default).
apiVersion: v1
kind: ServiceAccount
metadata:
  namespace: mynamespace
  name: example-sa
Kubernetes 会为一个 ServiceAccount自动创建并分配一个 Secret 对象,secret {data.token} 就是用户 token 的 base64 编码。PS:kubectl describe secret 和 kubectl get secret 看到的信息不同
$ kubectl get sa example-sa -n mynamespace -o yaml
- apiVersion: v1
kind: ServiceAccount
metadata:
    creationTimestamp: 2018-09-08T12:59:17Z
    name: example-sa
    namespace: mynamespace
    resourceVersion: "409327"
    ...
secrets:
- name: example-sa-token-vmfg6
$ k describe secret  example-sa-token-vmfg6
Name:         example-sa-token-vmfg6
Namespace:    mynamespace
Labels:       <none>
Annotations:  kubernetes.io/service-account.name: example-sa
              kubernetes.io/service-account.uid: 0fc75075-41b9-48e5-af75-c1b31d64955b

Type:  kubernetes.io/service-account-token
Data
====
ca.crt:     1346 bytes      # apiserver 的公钥数字证书
namespace:  11 bytes        # secret 所在namespace 值的base64 编码
token:      xx              # 用API Server私钥签发(sign)的bearer tokens的base64编码,反解析后是一个json,也称之为 service-account-token
用户的 Pod可以声明使用这个 ServiceAccount
apiVersion: v1
kind: Pod
metadata:
namespace: mynamespace
name: sa-token-test
spec:
containers:
- name: nginx
    image: nginx:1.7.9
serviceAccountName: example-sa
等这个 Pod 运行起来之后,我们就可以看到,该 ServiceAccount 的 token,也就是一个 Secret 对象,被 Kubernetes 自动挂载到了容器的 /var/run/secrets/kubernetes.io/serviceaccount 目录下(volume 方式),client-go restclient.InClusterConfig() 会从这个位置加载认证信息。
$ kubectl describe pod sa-token-test -n mynamespace
Name:               sa-token-test
Namespace:          mynamespace
...
Containers:
nginx:
    ...
    Mounts:
    /var/run/secrets/kubernetes.io/serviceaccount from example-sa-token-vmfg6 (ro)
service count 的认证和授权过程
- API Server的authenticating环节支持多种身份校验方式:client cert、bearer token、static password auth等(Kubernetes API Server会逐个方式尝试),这些方式中有一种方式通过authenticating,那么身份校验就会通过。一旦API Server发现client发起的request使用的是service account token的方式,API Server就会自动采用signed bearer token方式进行身份校验。
- 用户名为:
system:serviceaccount:(namespace):(serviceaccount) - credentials: service-account-token
- 用户名为:
- 通过authenticating后,API Server将根据Pod username所在的
group:system:serviceaccounts和system:serviceaccounts:(NAMESPACE)的权限对其进行authority 和admission control两个环节的处理。在这两个环节中,cluster管理员可以对service account的权限进行细化设置。
根据serviceaccount 制作 kubeconfig 文件
从sa 获取的 secret 获取信息
name=default-token-sg96k
ca=$(kubectl get secret/$name -o jsonpath='{.data.ca\.crt}')
token=$(kubectl get secret/$name -o jsonpath='{.data.token}' | base64 --decode)
namespace=$(kubectl get secret/$name -o jsonpath='{.data.namespace}' | base64 --decode)
将以上信息 替换下列yaml 文件中的变量
apiVersion: v1
kind: Config
clusters:
- name: default-cluster
  cluster:
    certificate-authority-data: ${ca}
    server: ${server}
contexts:
- name: default-context
  context:
    cluster: default-cluster
    namespace: default
    user: default-user
current-context: default-context
users:
- name: default-user
  user:
    token: ${token}
小结
- 有哪些资源
- Role 表述对这些资源的操作能力
- User/ServiceAccount 和 Role 绑定在一起,进而拥有Role 所具有的能力
- Pod 和 ServiceAccount 绑定在一起, Pod内进程可以使用 k8s push到本地的ServiceAccount 数据访问 api resource